Camping in india : Camping Gears and Accesories
In the last post, Travel Tips: Everything you need to know about camping in India: Part 1, we saw what camping in India really takes. We saw the effects of weather, the problems with nature’s call and the fact that camping on your own is not the same as going with an organisation that set up the camping for you. If that post didn’t dissuade you from camping on your own and in fact fired you up, then this post is for you. We will give you guidelines on how to prepare and what to carry.
Tip #1: Camping Gears: Try it out for cheap by renting
Before you buy all the equipment needed for camping, you may consider giving camping by self a trial and see if it really is for you. Most people start with high hopes, but find that camping on their own is tricky. The costly tents they purchased are now lying in their attic, while they prefer to go with organisations that set up camps.
In our opinion, you should rent camping equipment during your first outing. In Mumbai, we know a shop in Dadar locality that gives out equipment for rent. Similar equipment may be available for rent in cities like Pune and Bengaluru that are surrounded by hills and forests. Adventure equipment shops in towns like Uttarkashi, Mussoorie and Loharjung in Uttarakhand also give out equipment for rent.
Along with tents, you can rent other equipment like gas canisters, torches, ropes and shoes. If you are from Mumbai / Pune, you can also rent online at Bragpacker.com. Residents of other cities can check out 10kya.com
Tip #2: Camping Tents: Firmly decide the number of persons for your trip

Indecisiveness can throw your planning out of gear. Image source: Amazon.com
Getting the number of persons for your trip correct is a major problem, especially if you are among a group of people who keep changing their minds. Organisations like YHAI make it easy on themselves by deciding batch sizes and taking in reservations. They already know the maximum number of people per batch. If people do not turn up, they still carry spare tents and food as reserves, since they already have hired porters for maximum capacity. The opposite problem of taking in too much people does not arise because they take in reservations for their treks.
The number of people for the trip determines how many tents & sleeping bags you’ll carry, how much food you’ll haul and the mode of transport you’ll take to your destination. It is always safer to err on the higher side. For instance, if you planned for 7 persons and only 5 turn up, that’s fine. But if you plan for 5 persons and 7 turn up, then you have a problem. Two persons need to be crammed into the available tents and the food also needs to get split into smaller portions.
For a group that’s indecisive, it is better to let each person buy their own equipment, such as a one-man tent, and carry their own food, rather than ordering catered food for everyone.
For India 360, the number of persons was always 2. We didn’t camp with anyone else, although we had several travel companions at several places. 🙂
Tip #3: Camping Equipments: Get the smallest and cheapest equipment you can
When you start camping, do not go for high end equipment that is used by professionals. There is no need to splurge for what will just be a hobby during weekends or during short to medium term travels, with the costs borne by you. Start with a one, two or a three-man tent by Quechua, the brand that is attempting to bring adventure at an affordable price to the people of India. You can pick up really good tents for really economical prices from Decathlon outlets. Cities like Mumbai, Bengaluru, Delhi, Chennai, Kolkata, Hyderabad, Ahmedabad and Pune have multiple Decathlon outlets, one of them probably close to you. Otherwise, they have an online shop that delivers around India. Amazon India also stocks Quechua products.
You can find similar deals for sleeping bags, shoes, rucksacks, backpacks and dri-fit clothes.
Tip #4: Camping anD hiking: Pack smart

A well-packed backpack / rucksack should stay upright without support and should not tilt to any side.
Your sleeping bag should always go to the bottom of your rucksack / backpack. It should be plush against your lower back. Other heavy items also go near the bottom of the bag on top of the sleeping bag. After your heavy items are done, pack things in order of priority in which you might take them out during your trek / travel. Items take out more often, such as sun glasses, caps, gloves, bandana, dry food, etc, should be at the top of your backpack or preferably even in a seperate compartment of your bag. Your tent usually straps to the side of your backpack and is tied by a strap or an elastic rope. Further down in your backpack should only be items that you’ll need when you camp.
After packing, make the backpack stand on the floor with no support. If it tilts to one side or away from where your back would be, then you have packed it unevenly and you need to redistribute. If it tilts such that it would lean on you, then that’s not a problem.
Packing smart is actually a checklist that goes A-B-C. The letter B stands for balance and is achieved when you pack your backpack such that it will willingly stand on the floor. A for accessibility, which means that you will be able to fish frequently used items from the top of the backpack, without having to rummage into the depths of it. C stands for compression and we’ll come to that point when we discuss ranger rolling.
Tip #4: camping bag: Get the right backpack
You need a backpack with good adjustments. Your go-to bag should be 50 to 60 litres, while you should have a 15 litre bag folded and packed just in case you need to explore some spots around your camping site. The backpack should have enough straps such that you can yank and pull at them to create various measures of tightness and looseness. You should be able to tighten it enough so that it sits firmly against your back. You shouldn’t be able to slide your hand between your back and the backpack. At the same time you should also be able to loosen the bag, so that you don’t have to do multiple shrugs to get it on your shoulders in the first place. Nor should you have to struggle to shrug it off your back when you reach your campsite.
The correct way to get a backpack on your back is to loosen the straps and slide each of your hands into each strap, such that the straps sit on the elbows. Once both the elbows have one strap each, you heave just once and the backpack should automatically jump to your shoulders. Thereafter, you tighten each strap until the bag sits against your back firmly. Never get one strap all the way upto one shoulder. This leads to comical and uncomfortable episodes where you are trying to wiggle your other hand into the other strap and tumbling around.
Tip #5: Camping to DO: Learn to ranger roll
Ranger rolling is way to pack clothes for trekking and camping. It involves creating pockets within the folds of clothes so that the item tucks into itself and does not unravel. The space occupied by ranger-rolled clothes is incredibly smaller compared to that by folded clothes.
Here is a YouTube video on ranger rolling.
You can watch the whole series on the Youtube playlist: Packing, Folding, Organizing by armygringo.
Tip #6: camping Accessories: Always carry a steel plate, spoon and mug… and a sponge
Disposable plates, cups and spoons should be AVOIDED as much as possible. You should always carry a steel plate, spoon and mug for your camp meals. You should be able to wash them after use with water in a nearby lake, stream or pond. Also, never dump steel utensils directly in water bodies, unless it is fast flowing. You should wet a sponge and wipe your steel utensils clean. Mud is usually a good scouring agent and can be coated lightly on the plates before wiping them.
As a promise, also try to avoid anything that comes in a paper or plastic wrapper if you can and carry things in airtight boxes such as Tupperware. Granola bars and dry food can be taken out of their wrappers and stored in airtight boxes that can be carried in your backpack. Problems happen when you have wet or gooey food items like chocolates and juice in pouches and cartons. In this case, completely unfurl the plastic and carton and scoop every last bit / drop with your spoon and finish the item. Once clean of residue, the wrappers / cartons can be dumped into your back pack. If you are carrying a seperate food bag, then put all the paper and plastic waste right back in it as you carry it back to the city.
REMEMBER: No dumping paper, food or plastic waste in camping sites…… EVER! We repeat. Do not EVER dump rubbish in any camping site. Leave the world a better place than how you found it. At least leave it the same. Never deteriorate a naturally beautiful place with all your urban waste.
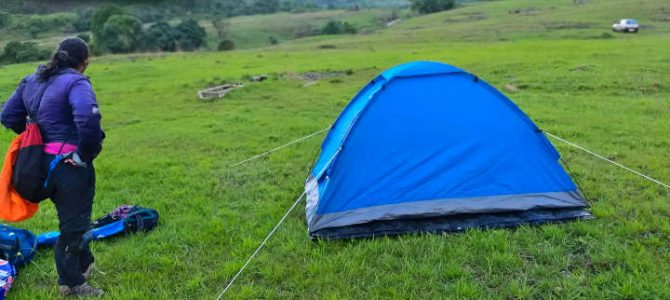
Tip #7: Basic tent pitching in camping sites
We have already mentioned in the last post that camping should ideally be on short grass or a surface with earth / sand. The first layer that goes on is a sheet of tarpoline. The tarp sheet keeps the floor of the tent dry, should it rain or snow. Next comes the process of laying the tent flat on the tarp. Smooth out all the kinks and creases. Tents usually have a couple of fibre glass poles that form the skeleton. The skeletons go through designated slots on the tent walls. The poles are in in form of segments joined end to end by slotting the notch at one of a segment to the corresponding hole in another segment. The assembled pole can be bent to a semicircular or parabolic shape. This shape is what keeps the structure of the tent after it is pitched.
After the tent is standing, it is time to secure the nylon ropes to the designated loops on the tent wall. The other ends of the ropes are tied to ‘pitons’ or steel rods that drive into the grass or earth. The pitons are stakes in the ground and prevent the tent from flying away if the ropes are tied securely. If the ground is hard and the pitons cannot be driven in, then you can find heavy stones or rocks that you can tie your nylon ropes to.

Two fibre glass poles are passed through slots in the tent’s fabric. The poles hold the tent in its shape. The tent is held in place by the four nylon ropes whose ends are tied to loops in the tent’s wall and also to steel pitons staked to the grass. Our heavy luggage did the rest.
With this, the tent should last the night. It is time to dump your heavy backpacks and sleeping bags into the tent. Leave your shoes outside the entry flap of the tent and also keep a pair of slippers that you can use to walk around the campsite. Once you get inside, the combined weight of the backpacks, the sleeping bags and your body will keep the tent securely in place. At least ‘All izz well’ inside the tent, no matter what happens outside.
Here is a video on pitching a typical Quechua Arpenaz tent.
Tip #8: Try your tent and sleeping bag in your apartment hall / backyard / lawn first

Practising tent pitching at the hall of our Thane apartment.
You do not want to be fumbling with instructions on a camping site in fading light, wind, rain or snow. Always try pitching a tent in a known place such as your bedroom, hall, balcony, backyard, porch or lawn. Practise it twice.. and then more. Practise until it becomes familiar. Assemble and take down the tent again and again. Unroll and roll your sleeping bag as many times as you feel is necessary for practice.

Can our pitched tent take some baby mischief? We invited our nephew and niece inside the tent while practising pitching at their parents’ home in Assam. The niece is clearly claustrophobic and wants out 😀
Tip #9: camping food: Avoid cooking during your first few camping trips
Since packing for camping is already daunting, you do not want to make it more complicated by carrying raw food ingredients, a fairly heavy gas canister and a cooking stove. I strongly advise you against using firewood. It is hard to light a pile of firewood anyway. Also, it is not a good idea to cut fresh wood from trees and use them as fuel. Do not cause your own mini-deforestation. Using dry wood and twigs is fine, but you don’t want to gather firewood if you don’t know how to do it the right way. A gas canister and stove save you that trouble.
But all troubles are solved when you buy food along the way or prepare it before the trip. Take as much dry food as you can. On a multi-day camp, wet items like gravies, fresh fruits and fresh vegetables will spoil quickly. Drier items like granola bars, dry fruits and baked vegetable chips last longer. So do roasted, toasted and fried items like theplas, mathris, papads, tortillas, nachos and mixtures. Vegetables last longer if they are pickled.
Tip #10: camping clothes: Pack a seperate set of clothes for your activities and for camping
You should always have one dry set of attire that you wear within the camp site inside your tent. This set is to keep you dry. It also keeps you warm if you camp in cold places. Never wear that set for activities like trekking, travelling, enjoying waterfalls, etc. Just like you have your day clothes and then pyjamas / nighties for your city life, you should have two sets for camping too.
In cold weather, your woollen socks, thermals, woollen gloves, woollen caps and dry tees and pants should make up your night dress. During the day, even in cold weather, you’ll use dri-fits and cotton. Through the course of your activity, your body will generate warmth. If you are out in the snow, you’ll need a fleece jacket, woollen gloves, woollen cap and a layer of woollen socks over your cotton socks. But that woollen set should not be the same that you wear for the night. Those will get wet in rain and snow and shouldn’t be used while sleeping.
Also, your night set should be packed in two layers of plastic or any other waterproof material to keep them from getting wet, even if your backpack gets wet.
Tip #11: Your water intake
Avoid plastic or glass bottles. Your best bet is to take a sturdy steel sipper that won’t easily crack or get dented. If your camping is also accompanied by activities like trekking, then we suggest you to buy a ‘hydration pouch‘, which is a leak-proof pouch that can hold 1 or 2 litres of water. A pipe with a valve is attached to the pouch. Instead of getting your backpack off to take your water sipper, you can leave a hydration pouch within your backpack, but keep sipping the water from the pipe after releasing its valve. When you are done sipping, you can close the valve. This is also useful to have a sip of water while lying down, say when you wake up from your sleep in the middle of the night to drink some water and intend to go back to sleep again.
Tip #12: Wet wipes, dry wipes, paper soap and hand sanitiser
Carry an assortment of wet tissues, dry tissues, paper soap and a hand sanitiser fluid. These come in handy when you attend nature’s call or also when you get your hands dirty, such as when pitching your tent. Remember to collect your used paper soap in the same bag compartment where you are keeping all your other discardables (plastic wrappers, paper pouches, etc). A spritz of hand sanitiser fluid disinfects your hands before you touch your food.
Tips #13: what do you need for camping? : Your minimum luggage
While there are several things you can carry for camping, some of them essential and some of them unnecessary & even weird (we saw a girl carry her hair spray and use it at the campsite!), here are the things that you should have at a minimum. These are in order of importance.
- Tent with its kit and tarpoline sheet. This is priority #1 since you are camping on your own.
- Water bottle or water pouch
- Wallet with cash (make sure you have CASH, since remote places have no networks for either card machines or digital wallets to work)
- Identity cards: Aadhar / passport, driving license
- Required permit if the campsite has restrictions
- Wet tissue, dry tissue, paper soap, hand sanitiser
- Torch
For a battery-operated torch, carry extra batteries.
For a torch with a solar charged battery, please make sure that the torch is fully charged by dusk. You can hand it on the outside of your backpack during the day, where it catches the sun.
The best types of torches for camping overnight are the ones with a hand-operated crank. You whirl or press a crank attached to the torch and it gets charged by the kinetic energy. You may need to rotate / press the crank about 500 – 600 times to charge the torch completely so that it lasts the night. Makes for a good hand workout. Delegate the cranking among other campers too. - Backpack / rucksack. Why is this as low as point #8? Well, you don’t need a backpack if you have driven to your campsite and intend to leave your stuff in the car until the next morning.
- Sleeping bag. A sleeping bag is not strictly necessary if you are camping during monsoon in the Western Ghats. That’s why we have it as point #9. If you are camping in the Himalayas, this would be point #2, right after tent. But contrary to what is advertised all the time, we don’t want to project that camping in India is all about being in the Himalayas. You can camp in forests, grasslands, riversides, lakesides, beaches, mountain tops, mountain caves (the last three are particularly popular in Maharashtra), outskirts of villages or even in plain areas near national highways all around the country, be it warm plains or freezing mountains.
For warm areas, you can carry an inflatable mattress or an air pillow instead of a sleeping bag. - Separate dry clothes inside a waterproof bag for wearing at the campsite
- Dry food or long-lasting food. Not required if your campsite is a short distance away from restaurants or kitchens.
- Steel plate, spoon, mug
- Slippers for the campsite, preferably in the form of loafer socks, i.e. socks cum slipper
- Mobile phone, portable battery charger, appropriate cable to connect the phone to charger
- Camera, tripod, selfie-stick. Please note that selfie-sticks are not just for selfies. They can take photos from interesting angles without you being part of the photo.
- Plenty of episodes of your favourite TV / Internet series downloaded to your phone for offline watching. Even we have lost count of the number of episodes of Mentalist and Elementary that we watched during our India 360 camping days. This is useful for insomniacs. But then also carry a headset / earphone, so that you don’t disturb your tent-mate / neighbouring tents
Tip #14: cAmping Fun

Fun Camping in Malshej Ghat !!
Camping on your own entails a lot of mental and physical exertion. It is easy to get diverted away from the natural beauty of the place you have chosen to camp. It is easy to get caught up in the whirlwind of activity around camping on your own. Pitching a tent reliably, unpacking and serving food, cleaning your utensils, taking care of garbage, setting up your sleeping bag, unpacking and packing your backpack and keeping everything safe for the night. But you have to take breathers and enjoy the moment and your surroundings.
Conclusion
Camping on your own needs a lot of preparation. It needs attention to detail and prioritising the right things. It needs the right place, right weather and the right person to do it with. But once you get a hang of it, you’ll be hooked. Even if you like going with a company that sets up camping for you, you’ll never get the same satisfaction that you derive from packing for a camping trip, planning your camping spot, pitching a tent and jumping into one that was set up with your own effort. You should definitely give it a try. Happy camping.